How to Add a Waistband to the Campbell Vest (or Jacket)
This tutorial shows how to add a knit waistband to the vest from the Campbell Jacket and Vest PDF sewing pattern. PLEASE NOTE: the free Basic Campbell Vest and Campbell Jacket patterns have now been retired, but you can find a similar jacket pattern here or a similar vest pattern here.
This technique can be used in exactly the same way to add a knit waistband to the jacket as well. (all closure options will work, including zipper)
AND!!!! You could use the exact same technique to add knit cuffs to the Campbell Jacket! You would just need to sew the cuff to one sleeve before you start constructing the jacket (stretching the cuff to match the sleeve width), and then do everything else as per usual, except needing to stretch the cuff gently when you connect the two sleeves. The measurements for the cuffs would be calculated in the same way as the waistband, as detailed below.
***PLEASE NOTE*** If you plan to place a button or snap in the waistband area, you will need to apply a strip of fusible interfacing to the short edges, in the same way that you do to the front edges of the vest (or jacket) when using stretchy knit fabric. Please see original tutorial for more info on interfacing.
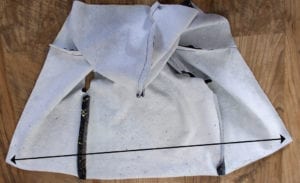
Step 1 - Decide how tall you want your waistband to be, and remove exactly that much from the bottom of your front and back pieces (shown by the dotted line - you can fold it up so you can reuse the pieces later for a full length vest if desired, or you can just cut the excess off). Mine is 2".

Step 2 - Cut your modified front/back and other normal pieces (hood, sleeve, etc) and construct your inner and outer vest (or jacket) as per usual. Once you've done that, measure the width of the bottom of your vest (or jacket), from corner to corner, right along the bottom edge.
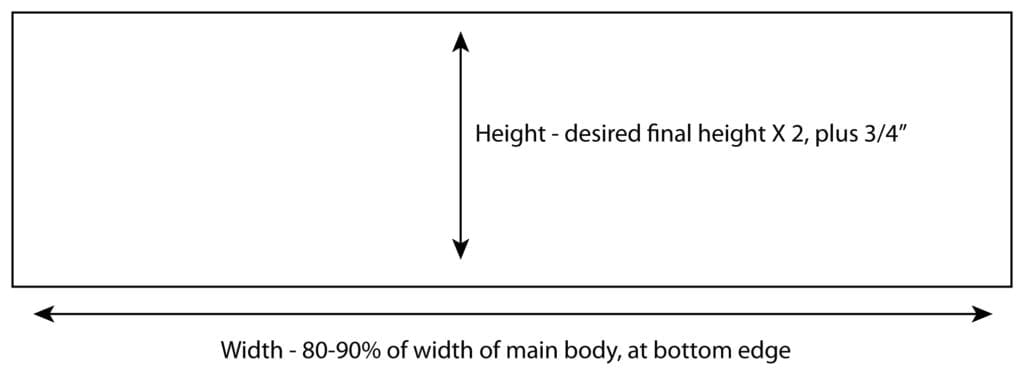
Step 3 - Cut a waistband to the following dimensions:
HEIGHT - 2x the desired final height of your waistband (so 2x the amount you cut off your front/back pieces) PLUS 3/4" (2cm) of seam allowance. So for my example, the height would be 4.75". (2" times 2, plus 3/4")
WIDTH - 80-90% of the width you measured in step 2. I did mine at 80%, using a cotton lycra with approximately 60% stretch. If your fabric has less stretch, or you want the garment to be less snug in the waistband area, use a higher percentage.
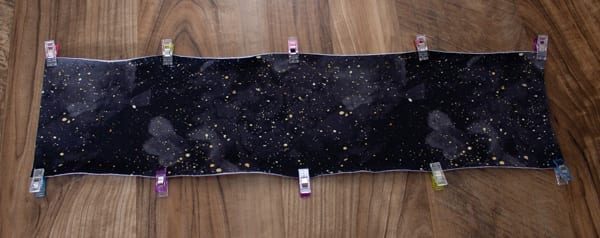
Step 4 - As shown below, divide your waistband into 4 equal sections along both long edges, using pins or clips to mark the following points: center, outer edges, and the middle points between center and edges.
Step 5 - Pin or clip one of the long edges of the waistband to the bottom edge of your OUTER vest (or jacket), matching up the center point, outer edges, and then stretching gently until the waistband is the same width and pinning/clipping in between. Then sew.
Step 6 - Next, pin/clip the other long waistband edge to the vest (or jacket) lining in the same way. Sew it, but this time you will need to leave a gap in the middle, in the same way you do along the bottom edge seam in the original pattern. ***EXCEPTION*** - if you are doing a vest and adding bands or binding to the armholes, you can sew it completely shut and turn it right side out via the armholes.
Step 7 - put the inner and outer vest/jacket together as shown, matching up the seams, and sew the front/hood edges (please note, if you are doing a zipper you will need to sew it in at this point, following the original instructions). Then finish the vest (or jacket) in the same way as the original pattern - connecting the armholes (or sleeves), turning right side out and topstitching and adding closures. Make sure you sew the gap closed (you will need to do this by hand, using a ladder stitch).

And done!! This gorgeous geometric fabric was provided by Crookshanks Custom Textiles, and is available for preorder until Apr 5 2019.